Making Copies
13-Jul-2010
8200810000
Solution
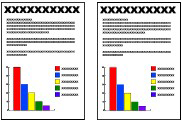
You can make enlarged or reduced copies of the original to fit the page size, and borderless copies of a printed photo, besides standard copies.
This section describes the procedure to copy a document of A4 or Letter size on plain paper.
For the operation, see the notes and operation procedure described in the reference page.
You need to prepare:
Originals to copy.
Paper for printing. See Media Types You Can Use .

1.Prepare for copying.
(1) Turn on the power.
(2) Load paper.
See Loading Paper.
Here we load A4 or Letter-sized plain paper in the Rear Tray.
(3) Open the Paper Output Tray gently, and open the Output Tray Extension.

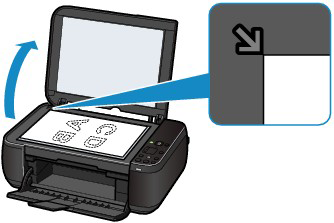
(4) Load an original on the Platen Glass.
Load the original WITH THE SIDE TO COPY FACING DOWN and align it with the alignment mark  as shown below.
as shown below.Then close the Document Cover gently.
NOTE
Characters and lines written with a light colored pen or highlight pen may not be copied properly.
2.Start copying.
(1) Press the [+] button repeatedly to specify the number of copies (max. 20 copies).

To make 1 to 9 copies or 20 copies
Display the desired number of copies on the LED.
Each time you press the [+] button, the number on the LED increases by one. When F appears, the number of copies is set to "20". Press the [+] button again to return to "1".
To make 10 to 19 copies
(1) Display F on the LED.
(2) Load only the desired number of sheets to copy.
(2) Press the Paper button repeatedly to select the page size and media type.
The Paper lamp indicates the selected page size and media type.
Here we select A4 or 8.5" x 11" Plain Paper.
NOTE
- You can select the following page sizes and media types.
- A4 or 8.5" x 11" Plain Paper
- A4 or 8.5" x 11" Photo Paper
- 10 x 15 cm or 4" x 6" Photo Paper
- You can switch the size of paper loaded in the Rear Tray between A4 and 8.5" x 11" (Letter) regardless of the size indicated on the Operation Panel.
See Switching the Page Size between A4 and 8.5" x 11" (Letter).
- When the Fit-to-Page copy function is enabled, you can copy the original in the size automatically enlarged or reduced to fit the selected page size. In this case, the original is copied with borders on the plain paper and without borders on the photo paper.
Cancel the Fit-to-Page copy function to copy the original in the same size.
See Fit-to-Page Copying.
(3) Press the Color button for color copying, or the Black button for black & white copying.
The machine starts copying.
While copying is in progress, the number on the LED flashes and decreases by one to indicate the remaining number of copies to be made.
Remove the original on the Platen Glass after copying is completed.
To make 10 to 19 copies
The paper-out error will occur ("E, 0, 2" will appear on the LED) when all of the loaded paper runs out. Press the Stop/Reset button to release the error.
NOTE
- You can set the print quality to "Fast" (speed priority) only when A4 or Letter-sized plain paper is selected for the page size and media type.
To set the print quality to "Fast" (speed priority)
1. Press and hold down the Color or Black button for 2 or more seconds in (3) of step 2.
The LED flashes once.
* When you press the Color or Black button for less than 2 seconds, the machine starts copying in the print quality "Standard".
2. Release the button.
The machine starts copying.
- When the print quality is set to "Fast", print speed is given priority over quality. To give priority to quality, press the Color or Black button for less than 2 seconds to copy in the print quality "Standard".
IMPORTANT
Do not open the Document Cover or move the loaded original until copying is completed.
NOTE
To cancel copying, press the Stop/Reset button.
- Switching the Page Size between A4 and 8.5" x 11" (Letter)
You can switch the size of paper loaded in the Rear Tray between A4 and 8.5" x 11" (Letter).
This setting is useful if you usually load Letter-sized paper in the Rear Tray regardless of the page size indication "A4" on the Operation Panel, or vice versa.
1.Press the  (Maintenance) button repeatedly until d appears.
(Maintenance) button repeatedly until d appears.
2.Press the Black button to select A4, or the Color button to select 8.5" x 11" (Letter).
NOTE
- When you switch the page size to A4 or 8.5" x 11" (Letter), load paper of the selected size regardless of the size indicated on the Operation Panel.
- When the page size is set to A4, load A4 plain paper or photo paper.
- When the page size is set to 8.5" x 11" (Letter), load Letter-sized plain paper or photo paper.
This section describes the procedure to copy a printed photo on 4" x 6" / 10 x 15 cm photo paper.

You need to prepare:
Printed photos.

Photo paper for printing. See Media Types You Can Use .

1.Prepare for copying a photo.
(1) Turn on the power.
(2) Load paper.
See Loading Paper.
Here we load 4" x 6" / 10 x 15 cm photo paper in the Rear Tray.
(3) Open the Paper Output Tray gently, and open the Output Tray Extension.
(4) Load a photo on the Platen Glass.
2.Start copying.
(1) Press the [+] button repeatedly to specify the number of copies.
See step 2 in Copying Documents.
(2) Press the Paper button repeatedly to select the page size and media type.
The Paper lamp indicates the selected page size and media type.
Here we select 10 x 15 cm or 4" x 6" Photo Paper.
NOTE
- You can select the following page sizes and media types.
- A4 or 8.5" x 11" Plain Paper
- A4 or 8.5" x 11" Photo Paper
- 10 x 15 cm or 4" x 6" Photo Paper
- You can switch the size of paper loaded in the Rear Tray between A4 and 8.5" x 11" (Letter) regardless of the size indicated on the Operation Panel.
See Switching the Page Size between A4 and 8.5" x 11" (Letter).
- When the Fit-to-Page copy function is enabled, you can copy the original in the size automatically enlarged or reduced to fit the selected page size. In this case, the original is copied with borders on the plain paper and without borders on the photo paper.
Cancel the Fit-to-Page copy function to copy the original in the same size.
See Fit-to-Page Copying.
(3) Press the Color button for color copying, or the Black button for black & white copying.
The machine starts copying.
Remove the photo on the Platen Glass after copying is completed.
IMPORTANT
Do not open the Document Cover or move the loaded photo until copying is completed.
NOTE
To cancel copying, press the Stop/Reset button.
The Fit-to-Page copy function enables you to copy the original automatically enlarged or reduced to fit the selected page size.

1.Prepare for copying.
See step 1 in Copying Documents.
2.Press the [+] button repeatedly to specify the number of copies.
See step 2 in Copying Documents.
3.Press the Paper button repeatedly to select the page size and media type.
NOTE
- When the plain paper is selected for the media type, the original is copied with borders. When the photo paper is selected for the media type, the original is copied without borders and fills the entire page.
- In borderless copying, slight cropping may occur at the edges since the copied image is enlarged to fill the whole page.
4.Press the Fit to Page button.
The Fit to Page lamp lights up and the Fit-to-Page copy function is enabled. The original is copied in the size automatically enlarged or reduced to fit the selected page size.
NOTE
Press the Fit to Page button again to cancel the Fit-to-Page copy function and copy the original in the same size.
5.Press the Color button for color copying, or the Black button for black & white copying.
The machine starts Fit-to-Page copying.
Remove the original on the Platen Glass after copying is completed.
IMPORTANT
Do not open the Document Cover or move the loaded original until copying is completed.
NOTE
- You can set the print quality to "Fast" (speed priority) only when A4 or Letter-sized plain paper is selected for the page size and media type. To set the print quality to "Fast", press and hold down the Color or Black button for 2 or more seconds in step 5.
See To set the print quality to "Fast" (speed priority).
- To cancel copying, press the Stop/Reset button.