Printing the Nozzle Check Pattern
16-May-2008
8200182300
Solution
Print the nozzle check pattern to determine whether the ink ejects properly from the Print Head Nozzles. Use this function when printed results are blurred or a color is incorrect.
NOTE
The nozzle check pattern can also be printed by pressing the RESUME/CANCEL button on the printer.
1. Ensure that the printer is turned on, and then load a sheet of A4 or Letter-sized plain paper.
2. Hold down the RESUME/CANCEL button until the POWER lamp flashes twice, and then release it immediately.
- Windows
1. With the printer on, load a sheet of A4 or Letter-sized plain paper in the Auto Sheet Feeder.
2. Open the Printer Properties dialog box.
. Print the Nozzle Check Pattern.
(1) Click the Maintenance tab.
(2) Click Nozzle Check.
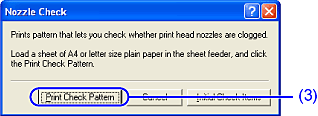
(3) Click Print Check Pattern.
NOTE
Click the Initial Check Items button. A confirmation message for printing the nozzle check pattern is displayed.
(4) When the confirmation message is displayed, click OK.
(5) Confirm the nozzle check pattern.
See "Examining the Nozzle Check Pattern".
- Macintosh
1. With the printer on, load a sheet of A4 or Letter-sized plain paper in the Auto Sheet Feeder.
2. Open the BJ Printer Utility dialog box.
NOTE
The BJ Printer Utility cannot be used with Bluetooth communication.
(1) Double-click the hard disk icon where the printer driver was installed, the Applications folder, and then the Utilities folder.
(2) Double-click the Printer Setup Utility icon.
If you are using an OS other than Mac OS X v.10.3, double-click the Print Center icon.
(3) Select iP90 from the Name list and click Utility or Configure.
(4) Select iP90 from the Product list and click Maintenance.
3. Print the Nozzle Check Pattern.
(1) Select Test Print from the pop-up menu.
(2) Click Nozzle Check.
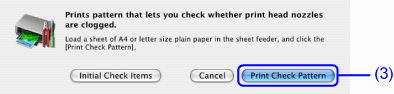
(3) Click Print Check Pattern.
NOTE
Click the Initial Check Items button. A confirmation message for printing the nozzle check pattern is displayed.
(4) Confirm the nozzle check pattern.
See "Examining the Nozzle Check Pattern".
The nozzle check pattern should appear as follows when ink is discharged properly.
Examine the nozzle check pattern output by the printer.
NOTE
If the ink level is low, the nozzle check pattern is not printed properly.
Replace an ink tank.
See [ Replacing an Ink Tank ].
1. Confirm the printed nozzle check pattern.
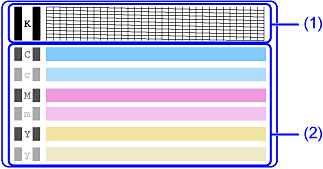
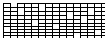
(1) Lines missing in this pattern indicate that the Print Head of black ink requires cleaning.
When with lines missing (black ink)
(2) White stripes in this pattern indicate that the Print Head of color ink requires cleaning.
When white stripes appear (color ink)
2. When cleaning is necessary, click on the Cleaning button on the Pattern Check dialog.
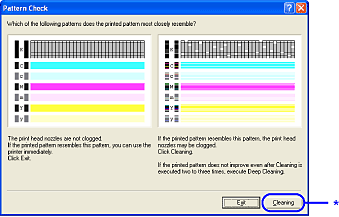
If there are neither missing lines nor white stripes in the nozzle check pattern, click Exit to finish the nozzle check.
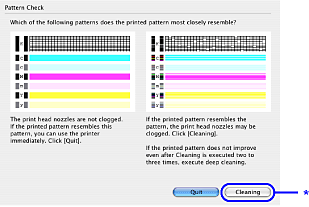
If there are neither missing lines nor white stripes in the nozzle check pattern, click Quit to finish the nozzle check.