Replacing an Ink Tank
16-May-2008
8200180800
Solution
If the print result is not improved after maintenance such as Print Head cleaning, an ink tank runs out of ink. Replace the ink tank with a new one. When replacing an ink tank, check the model number very carefully.
The printer will not print properly if a wrong ink tank is used, or installed in the incorrect position.
When an ink tank runs out of ink, replace it using the following steps.
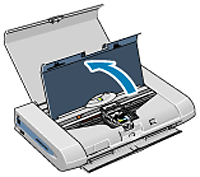
1. Ensure that the printer is turned on, and then open the Print Head Cover.
The Print Head Holder moves to the center.
2. Remove the empty ink tank.

(1) Push the tab.
(2) Remove the ink tank.
Then lift it from its slot.
Do not touch the Lock Lever; remove only the ink tank.
IMPORTANT
- Handle ink tanks carefully to avoid staining clothing or the surrounding area.
- Discard empty ink tanks according to the local laws and regulations regarding disposal of consumables.
3. Prepare a replacement tank.
(1) Unpack a new ink tank and remove the orange Protective Cap.
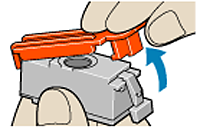
IMPORTANT
- Do not re-attach the Protective Cap once you have removed it.
- Once the Protective Cap is removed, do not touch the open ink port.
4 Insert the ink tank.
(1) Insert a new ink tank with it slightly slanted.
(2) Push down on the  on the ink tank until it clicks into place.
on the ink tank until it clicks into place.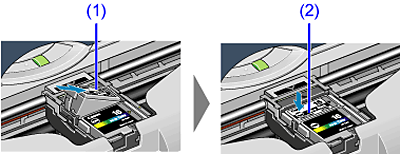
5. Close the Print Head Cover.
The Print Head Holder moves to the right.
IMPORTANT
When an ink tank is replaced, the ink counter must be reset.
NOTE
- To maintain optimal print quality, use an ink tank within six months of its first use.
- Once an ink tank has been used, do not remove it from the printer and leave it out in the open. This will cause the ink tank to dry out and the printer may not function properly if it is reinstalled.
- Color ink consumption may occur even when black-and-white or grayscale printing is specified. Color ink is consumed in the head cleaning and deep cleaning, which are necessary to maintain the printer's capabilities.
- When an ink tank runs out of ink, replace the ink tank with a new one immediately. If printing is continued with no ink in the ink tank, a problem may occur. And, the Low Ink Warning dialog which tells the exchange time of an ink tank cannot be indicated properly.
When an ink tank is replaced, the ink counter must be reset. The low ink warning is only displayed properly if the ink counter is reset.
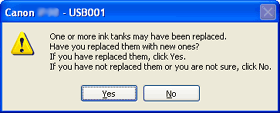
- Message Prompting Confirmation of Ink Tank Replacement(Windows)
If an ink tank is removed, the printer will output a message prompting you to confirm replacement of the ink tank at the start of the next print job.
When an ink tank has been replaced, follow the procedure below to reset the ink counter. The low ink warning is only displayed properly if the ink counter is reset.
IMPORTANT
If infrared communication is performed in Windows XP or Windows 2000, the printer will not output the message asking for confirmation of ink tank replacement.
Reset the ink counter from the printer driver when you replace the ink tank.
1. Check the message, and click Yes.
NOTE
Mistakenly clicking No instead, will prevent the low ink warning from functioning properly. If this happens, be sure to open the driver's Properties dialog box and manually reset the ink tank counter in the Maintenance tab.
See "Resetting the Ink Counter in Printer Properties dialog box".
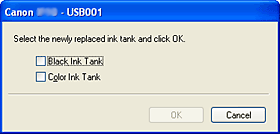
2. Select the replaced ink tank, and click OK.
- Resetting the Ink Counter in Printer Properties dialog box
(Windows)
1. Open the Printer Properties dialog box and click the Maintenance tab.
2. Click Ink Counter Reset.
3. Select the newly installed ink tank, then click OK.
(Macintosh)
NOTE
The BJ Printer Utility cannot be used with Bluetooth communication.
1. Double-click the hard disk icon where the printer driver was installed, the Application folder, the Utilities folder, and then the Printer Setup Utility icon.
If you are using an OS other than Mac OS X v.10.3, double-click the Print Center icon.
2. Select iP90v from the Name list and click Utility or Configure.
3. Select iP90v from the Product list and click Maintenance.
4. Select Remaining ink level setting from the pop-up menu.
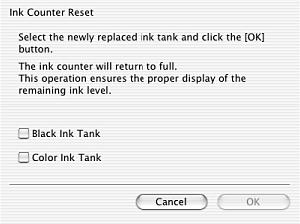
5. Click Ink Counter Reset.
6. Select the newly installed ink tank, then click OK.
The low ink warning notifies you of low ink levels during printing. The Low Ink Warning has been preset to be automatically displayed.
When you reset the ink counter, it will assume the ink tank is full regardless of how much ink actually remains. The reset is the only way to match the counter value with an actual ink volume. Reset the ink counter when installing a new ink tank.
- Low Ink Warning Display
The '!' shows a low ink level in the ink tank.
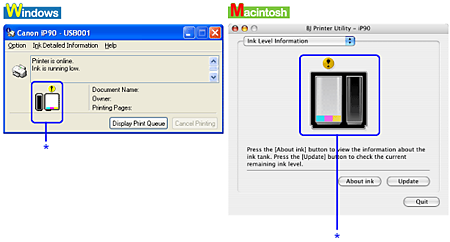
* The color ink becomes low.
NOTE
How to Check Ink Level
- Windows
Open the Printer Properties dialog box. Click the Maintenance tab and then Start Status Monitor.
If the ink level becomes low, the low ink warning is displayed when printing is performed.
- Macintosh
Open the BJ Printer Utility, and then select Ink Level Information from the pop-up menu.
- How to Display Low Ink Warning Correctly
- Reset the ink counter every time you install a new ink tank
The ink counter cannot work correctly unless you synchronize it with the actual ink level. The ink counter can only be adjusted when it is reset at the time a new ink tank is installed.
Do not reset the ink counter of an ink tank in use.
- Synchronization of the counter and the actual ink level will not work properly.
NOTE
If you did not reset the counter when you installed the current ink tanks, the low ink warning may not function correctly, until the next time you replace the ink tanks. Also, ensure that you treat both counters separately.